Monday, April 30, 2018

Lifestraw Flex Water Filter Review

Lifestraw Flex Water Filter Review

The Lifestraw Flex is a screw-on style backcountry water filter that is compatible with a wide range of soda-sized water bottles and reservoirs. While it comes with its own 22 oz soft-bottle, you can also screw it onto standard-sized soda bottles, Platypus or Evernew reservoirs, integrate it into a hose-based hydration system, use it in a gravity filter configuration, or even as a hand-held filter to drink directly out of a stream if you don't mind crawling on your belly to do it.

Specs at a Glance:

  • 0.2 micron pore size
  • Includes large syringe for backflushing
  • Removes 99.999999 % of bacteria
  • Removes 99.999 % of parasites
  • Reduces organic chemical matter (pesticides, herbicides, VOCs)
  • Exceeds NSF 53 standard for reduction of lead and other heavy metals
  • Exceeds NSF 42 standard for chlorine reduction
  • Exceeds US EPA drinking water standards for bacteria and parasites
  • Microbiological filter lasts up to 2,000 liters / 500 gallons
  • Replaceable carbon capsule lasts up to 100 liters / 25 gallons
  • Microbiological (Blue) Filter weight: 2.0 oz
  • Carbon capsule weight: 0.3 oz
  • Soft Bottle weight: 1.0 oz
  • Removes 99.999% of microplastics
  • Do not freeze as this will break the filter element

The Flex is a two-stage filter, a microbiological hollow fiber filter (blue) that filters out bacteria and parasites, with an optional activated carbon capsule that reduces chlorine, odors, organic chemical matter and bad tastes.

The microbiological filter has a 500 gallon lifetime while the carbon capsule only lasts 25 gallons, necessitating frequent replacement if you use the two together frequently. The replacement capsules cost $10 per pair.

But you don't have to use an activated carbon capsule if you don't want to. It can be removed from the cap and the unit reassembled without it. While the taste of natural waters sources doesn't bother me, I can see the benefit of using the carbon capsule to remove additional contaminants or odors, especially if you drink water from sources near agricultural activity where herbicides and pesticides are used.

The Lifestraw Flex consists of a soft bottle, a blue microbiological filter, a grey cap, and an activate carbon capsule, shown inserted into the cap.
The Lifestraw Flex consists of a soft bottle, a blue microbiological filter, a grey cap, and an activate carbon capsule, shown inserted into the cap. A plastic backflush syringe is also included (not shown)

The Flex also includes a 22 oz soft bottle. It can be combined in a number of different ways with the other components of the system depending on your needs. If you just want to use it as a bottle and not a filter, you can screw the grey pour top onto it as a cap. If you want to add in the blue microbiological filter, it screws into the interior of the pour spot, which then screws onto the soft bottle. And so on, like a Russian nesting doll.

While you can fill the Flex bottle from a stream and filter water, the real utility of this product is its ability to interoperate with other bottles and containers. For instance, you can screw the filter element onto the top of a soda bottle, or a higher capacity Platypus or Evernew soft bottle, or plug it inline with a hydration system. My preferred configuration is to use the Flex filter with a Platypus reservoir to squeeze filtered into a separate SmartWater bottle.

The one weakness of the Flex system is the system's flow rate, which is comparable to a Sawyer Mini, but slower than the large Sawyer filter included with the Sawyer Squeeze System. It's also slower than the Katadyn BeFree water filter.

The advantage of using the Lifestraw Flex over the Katadyn BeFree, is its compatibility with soda bottles, Platypus/Evernew reservoirs, and the ability to mate it with hoses in an inline or gravity filter setup. The Katadyn BeFree Filter is only compatible with Katadyn or Hydrapack soft bottles, which is a pretty limited universe.

The Lifestraw Flex is compatible with a wide range of bottle and reservoir types

The format and compatibility of the Lifestraw Flex reminds me of the AquaMira Frontier Pro Filter (see review), which is also compatible with regular soda bottle sizes, Platypus/Evernew Reservoirs, and can be used as an inline or gravity filter when connected to hoses. The Frontier Pro however, has a limit 50 gallon lifespan. The only other filter that can be used on all of these configurations is the Sawyer Mini, which is rated for 100,000 gallons (probably exaggerated), but has a pore size that's 0.1 micron compared to the Flex's 0.2 (microns).

Net net, if you want a water filter that is widely deployable in different configurations and reduces chlorine, odors, organic chemical matter and bad tastes, then the Lifestraw Flex with its activated carbon capsule is really the best alternative compared to the Sawyer Mini, Squeeze, Katadyn BeFree, and AquaMira Filters.

  • If you don't need an activated carbon filter, but you do want the ability to support a wide range of bottle types and hose-based configurations, the Sawyer Mini is probably the best choice because it has a longer lifespan than the Flex and a smaller pore size.
  • If filtering speed is your biggest priority, I'd opt for the Katadyn Befree 3.0L water filter, which is the fastest option.
  • If speed and bottle/reservoir compatibility are your most important needs, then I'd recommend the Sawyer Squeeze.

Disclosure: The author purchased this product with his own funds.

Compare 2 Prices

Last updated: 2018-04-30 20:28:24
Disclosure: SectionHiker.com receives affiliate compensation from retailers that sell the products we recommend or link to if you make a purchase through them and helps to keep our content free. Our mission is to help people, which is why we read and respond to all questions that readers leave in comments. We refuse all gear sponsorships to remain unbiased when we review gear.

The post Lifestraw Flex Water Filter Review appeared first on Section Hikers Backpacking Blog.


from Section Hikers Backpacking Blog https://ift.tt/2HYAYj1

Sunday, April 29, 2018

The North Face HyperAir GTX Trail Rain Jacket Review

The North Face Hyperair GTX Trail Rain Jacket Review

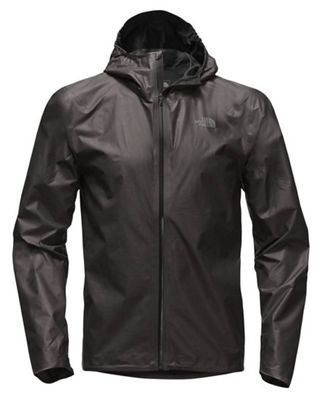
The North Face HyperAir GTX Trail Jacket is an ultralight, breathable rain jacket that only weighs 5.0 oz in a size XL and compresses down to the size of a sandwich bag. This jacket is even lighter weight and more minimal than the first generation HyperAir GTX Rain Jacket (note missing "Trail" in product name) that preceded it.

The HyperAir GTX Trail Jacket is different from most Gore-tex Jackets because the breathable layer is on the outside of the jacket, not sandwiched between additional layers of protective fabric. While this makes the Hyper GTX Trail very breathable, it does significantly cut down on durability, so much so, that The North Face recommends NOT using the HyperAir GTX jacket with backpack shoulder straps, lest they rub away the thin external Gore-tex layer. I guess they want backpackers to carry their gear in baskets on their head.

Minimal Features

That said, the HyperAir GTX Trail Jacket looks super cool. It has a slick, shiny exterior like a high-gloss leather jacket that everyone wants to touch when they first see it. Rain also beads up on it and rolls off easily. Feature-wise, the jacket has a waterproof main zipper, taped seams, a volume adjuster on the hood as well as a soft front visor, hem adjuster, and a rear stuff pocket with its own waterproof zipper. But being a minimalist jacket, it's outfitted more like a windbreaker than a rain jacket.

Breathability

The breathability of the HyperAir GTX Trail jacket feels flat-out better than any of the other the many Gore-tex jackets I've owned or reviewed. I've worn it in all-day rain storms and my clothes have stayed drier inside while wearing it. That's drier, not dry. My clothes still get damp inside, but I guess that's to be expected when you cover any waterproof breathable jacket with a backpack and hip belt, effectively reducing its breathable surface area by 50%.

Rain water beads on the rain jacket and rolls off easily

Assessment

Despite it's good breathability, I still consider the HyperAir GTX Trail Jacket to be a fail as a backpacking rain jacket for a host of reasons:

  1. The jacket makes a huge racket when worn, like the sound made when you crush a bag of potato chips repeatedly. It sounds like it's raining around you when you wear this jacket, even when it's not.
  2. The jacket is very thin, and while it blocks wind like a windbreaker, it's a very cold jacket that doesn't retain heat very well. I suppose staying cooler is a contributing reason for why you sweat less wearing it, but I prefer being damp and warm more than being damp and cold.
  3. There are no wrist cuffs, so rain water rolls down your hands into your shirt sleeves and soaks your lower arms.
  4. There are no neck cords to adjust the size of the hood opening or cinch it tight in blowing rain and high winds. The hood is tensioned with elastic sewn into the sides. I prefer a better hood adjustment system when hiking in the open, especially in the mountains, above treeline.
  5. There are no side or chest pockets, so you have to stop and get stuff out of your pack if you want to pull out a hat, or gloves, or put them away. The same goes for snacks or a map, etc. I like having jacket pockets and view them as a valuable extension of my backpack's storage capacity because they keep me moving quickly and help eliminate frequent stops.
  6. Durability is just plain awful. The fabric is very thin and is easily punctured. I didn't even have to bushwhack to poke holes in the jacket, although they can easily be repaired using tenacious tape.
You need to wear a billed cap with the jacket if you want to prevent rain from dripping onto your face

The North Face HyperAir GTX Trail Jacket can be a great trail running jacket when you're unencumbered by a backpack, you're cranking out vast amounts of body heat, and really just want a waterproof windbreaker. But I'd give it a pass if you're a backpacker and want a jacket that's more durable, has pockets, and a more adjustable hood.

Despite the HyperAir's GTX Trail's impressive breathability, I still prefer the highly durable, non-breathable Lightheart Gear Silnylon Rain Jacket, which has pit-zips for moisture evaporation and temperature regulation, pockets, and a fully adjustable hood. Priced under $100, it's still a great value that has withstood the test of time.

Published 2018.

Disclosure: The North Face provided the author with a jacket for this review.

Compare 1 Prices

Last updated: 2018-04-29 15:00:04
Disclosure: SectionHiker.com receives affiliate compensation from retailers that sell the products we recommend or link to if you make a purchase through them and helps to keep our content free. Our mission is to help people, which is why we read and respond to all questions that readers leave in comments. We refuse all gear sponsorships to remain unbiased when we review gear.


The post The North Face HyperAir GTX Trail Rain Jacket Review appeared first on Section Hikers Backpacking Blog.


from Section Hikers Backpacking Blog https://ift.tt/2jl8Jgx

Friday, April 27, 2018

IndieView with Kezia Arterberry, author of Empower You

Empower You is geared towards readers who struggle with negative thinking, setting goals and sticking to them. Or, if you just feel stuck in life and feel like there’s something more you should be doing with your life, then Empower You is the book for you.

Kezia Arterberry – 27 April 2018

The Back Flap

Empower You is all about empowering you to find the courage and motivation to pursue your goals, live your dreams and to ultimately live your life operating in your God given purpose. In Empower You, you will learn various tips and techniques that will help you develop the kind of mindset that will allow you to empower yourself in those moments when you need it most. This 70 day devotional focuses on the topics of self-confidence, goal-setting and developing a positive, success mindset. It’s about shifting your focus (mindset), therefore enabling you to overcome setbacks and break past limiting beliefs so that you can be your best self and live your best life!

About the book

What is the book about?

Empower You is a motivational – devotional designed to escort you through 70 days of mindset transformation. There are 70 days, each with a new topic that will challenge your current way of thinking and help you to develop a more positive and optimistic perspective in life. It’s a great place to start and offers stepping stones to success. I share tips and techniques that will help you improve in multiple areas in your life. The only catch is that you have to be willing to commit and to do the work!

When did you start writing the book?

I flirted with the idea of writing Empower You long before I actually began writing it. It wasn’t until I attended a workshop called Publish a Book and Grow Rich, which lit a fire beneath me, inspiring me to write the book. The writing process began in December of 2015.

How long did it take you to write it?

It took me about 1 year and 6 months to write Empower You, not including editing and designing the book cover. Even after what I considered the “final edit” of the book being completed, there were sections that were added after the initial year and 6 months.

Where did you get the idea from?

As I mentioned, I’d flirted with the idea of writing this book long before I actually began writing it. The idea was to take the entries from an inspirational blog that I had written and to turn that into a book. The blogs I wrote were based on my personal life experiences and making the best of negative situations. I had the idea to turn that blog into a book for a while, but I never acted on it. That is, until I attended a workshop called Publish a Book and Grow Rich. That workshop inspired me in ways I cannot explain. The information I learned went beyond learning how to write and publish a book and make money from it. I learned things about mindset and success that changed my entire perspective on life and how we live it. Ever since, I’ve been on a mission to share the knowledge I learned from it, because I’ve seen results in my life after applying the information I learned. So, Empower You, encompasses both ideas but with a twist; a 70 day devotional for mindset transformation.

Were there any parts of the book where you struggled?

My biggest struggle while writing Empower You was writers block. As passionate as I am about the topic of mindset transformation, and as much inspiration as I had, I still had moments where I just felt stuck and didn’t know what to write. And, I think that largely was due to my tendency to over-think and wanting to say the right thing, in the right way. Perfectionism, you can call it. When I was in that head-space, I would stop writing for a short period of time until I let go of the over-thinking, allowing myself to write freely. Because, once I began writing again, that’s when the ideas would flow with ease.

What came easily?

Starting. Simply starting to write the book was the easy part for me, because I was feeling inspired and was full of ideas that I couldn’t wait to get down on paper. I had all this momentum that made it feel like I could write the entire book in a day.

We all know how important it is for writers to read. Are there any particular authors that have influenced how you write and, if so, how have they influenced you?

There are so many individuals who inspire me, from family and friends, to well-known influencers. But, the one author I’d like to highlight is Brian Tracy! Brian Tracy is a very well-known author, motivational speaker, self-development and success expert. I absolutely love reading his books, because I have learned so much on topics that I have become very passionate about.

Do you have a target reader?

Empower You is geared towards readers who struggle with negative thinking, setting goals and sticking to them. Or, if you just feel stuck in life and feel like there’s something more you should be doing with your life, then Empower You is the book for you. Empower You, is also a great read for the seasoned entrepreneur, as well as aspiring entrepreneurs in need of motivation and strategies to take their life to the next level!

About Writing

Do you have a writing process? If so can you please describe it?

I don’t have a specific writing process. I tend to just write when I’m feeling inspired and having an idea in mind. It’s one of those things where I’m spontaneous and go with the flow. But then again, that is how I go about doing a lot of things in my life. It helps me to be more creative and enjoy the “process.”

Do you outline? If so, do you do so extensively or just chapter headings and a couple of sentences?

I do not outline. However, for Empower You, I did write in the format of outlining, simply because I had the 70 quotes as headlines/titles in place prior to writing what is really just an extension or elaboration of the quote itself.

Do you edit as you go or wait until you’ve finished?

I did not hire a professional editor to edit my book. So, I did edit as I went along, as well as after the book was completed. The editing process took a few months. Hiring a professional editor definitely would have saved time and energy.

Did you hire a professional editor?

No, I did not hire a professional editor this time. However, I did have someone else edit my writing only after I’d edited my book many, many times beforehand. I definitely plan on hiring a professional editor to edit my future books.

Do you listen to music while you write? If yes, what gets the fingers tapping?

It’s funny, but I listen to music while I’m going to sleep, drive, cook, clean, etc. But, I must say, I do not listen to music while I write. I really enjoy writing in silence, because it feels like I can hear my thoughts more clearly, if that makes sense.

About Publishing

Did you submit your work to Agents?

I did not submit my work to an agent. This time around, I’ve really dedicated my time and effort to researching and figuring out how to successfully self-publish my book on my own.

What made you decide to go Indie, whether self-publishing or with an indie publisher? Was it a particular event or a gradual process?

I have had previous experience with self-publishing and traditional publishing. I made a mistake with both. I did not do my research. I got excited and went with the most convenient options made available to me at the time. To make a long story short, in both instances, I ended up with a box of books and no idea how to promote/market my book. And, in order to get support from the publisher, I would have pay up more money than I had available.

Did you get your book cover professionally done or did you do it yourself?

You know, I decided to really embrace the experience of self-publishing and decided to create my book cover myself. My goal for the book cover was to create something that would convey the overall concept of my book and standout in the company of other self-help and personal development books. I didn’t want it to look like a typical self-help book.

Do you have a marketing plan for the book or are you just winging it?

One of the biggest mistakes I made in the past, with my 2 previous books, was not having a marketing plan. Unfortunately, at the time, I wasn’t aware of the necessity of having a marketing plan for my book. So, this time around, I definitely have a marketing plan in place.

Any advice that you would like to give to other newbies considering becoming Indie authors?

Yes, I encourage new authors to take their time (writing the book) and don’t rush the process. Also, do your research and do it well, when choosing a company to publish with. Publish with a company that will support you during the publishing process and after. And lastly, make sure that you have a marketing plan in place for your book. That way, you’ll avoid the biggest mistakes I made with my previous books. By not doing my research and not having a marketing plan in place, I ended up with a box of books and no idea what to do with them, beyond selling to close family and friends. You can avoid that if you research well and plan, plan, plan in advance!

About You

Where did you grow up?

I was born and raised in the sunny and hot valley of the sun! I am a Phoenix native.

Where do you live now?

I live in my hometown of Phoenix, Arizona.

What would you like readers to know about you?

I love to laugh, I am a proud cheesehead (go Packers!) and really, I just love to see people win in life!

What are you working on now?

I am working on putting together my upcoming book tour which will officially kick-off in May, lasting all throughout 2018 and well into 2019!

End of Interview:

For more from Kezia, visit her website.

Get your copy of Empower You from Amazon US or Amazon UK.


from The IndieView https://ift.tt/2JvJQcQ

IndieView with Kezia Arterberry, author of Empower You

Empower You is geared towards readers who struggle with negative thinking, setting goals and sticking to them. Or, if you just feel stuck in life and feel like there's something more you should be doing with your life, then Empower You is the book for you.

Kezia Arterberry – 27 April 2018

The Back Flap

Empower You is all about empowering you to find the courage and motivation to pursue your goals, live your dreams and to ultimately live your life operating in your God given purpose. In Empower You, you will learn various tips and techniques that will help you develop the kind of mindset that will allow you to empower yourself in those moments when you need it most. This 70 day devotional focuses on the topics of self-confidence, goal-setting and developing a positive, success mindset. It's about shifting your focus (mindset), therefore enabling you to overcome setbacks and break past limiting beliefs so that you can be your best self and live your best life!

About the book

What is the book about?

Empower You is a motivational – devotional designed to escort you through 70 days of mindset transformation. There are 70 days, each with a new topic that will challenge your current way of thinking and help you to develop a more positive and optimistic perspective in life. It's a great place to start and offers stepping stones to success. I share tips and techniques that will help you improve in multiple areas in your life. The only catch is that you have to be willing to commit and to do the work!

When did you start writing the book?

I flirted with the idea of writing Empower You long before I actually began writing it. It wasn't until I attended a workshop called Publish a Book and Grow Rich, which lit a fire beneath me, inspiring me to write the book. The writing process began in December of 2015.

How long did it take you to write it?

It took me about 1 year and 6 months to write Empower You, not including editing and designing the book cover. Even after what I considered the "final edit" of the book being completed, there were sections that were added after the initial year and 6 months.

Where did you get the idea from?

As I mentioned, I'd flirted with the idea of writing this book long before I actually began writing it. The idea was to take the entries from an inspirational blog that I had written and to turn that into a book. The blogs I wrote were based on my personal life experiences and making the best of negative situations. I had the idea to turn that blog into a book for a while, but I never acted on it. That is, until I attended a workshop called Publish a Book and Grow Rich. That workshop inspired me in ways I cannot explain. The information I learned went beyond learning how to write and publish a book and make money from it. I learned things about mindset and success that changed my entire perspective on life and how we live it. Ever since, I've been on a mission to share the knowledge I learned from it, because I've seen results in my life after applying the information I learned. So, Empower You, encompasses both ideas but with a twist; a 70 day devotional for mindset transformation.

Were there any parts of the book where you struggled?

My biggest struggle while writing Empower You was writers block. As passionate as I am about the topic of mindset transformation, and as much inspiration as I had, I still had moments where I just felt stuck and didn't know what to write. And, I think that largely was due to my tendency to over-think and wanting to say the right thing, in the right way. Perfectionism, you can call it. When I was in that head-space, I would stop writing for a short period of time until I let go of the over-thinking, allowing myself to write freely. Because, once I began writing again, that's when the ideas would flow with ease.

What came easily?

Starting. Simply starting to write the book was the easy part for me, because I was feeling inspired and was full of ideas that I couldn't wait to get down on paper. I had all this momentum that made it feel like I could write the entire book in a day.

We all know how important it is for writers to read. Are there any particular authors that have influenced how you write and, if so, how have they influenced you?

There are so many individuals who inspire me, from family and friends, to well-known influencers. But, the one author I'd like to highlight is Brian Tracy! Brian Tracy is a very well-known author, motivational speaker, self-development and success expert. I absolutely love reading his books, because I have learned so much on topics that I have become very passionate about.

Do you have a target reader?

Empower You is geared towards readers who struggle with negative thinking, setting goals and sticking to them. Or, if you just feel stuck in life and feel like there's something more you should be doing with your life, then Empower You is the book for you. Empower You, is also a great read for the seasoned entrepreneur, as well as aspiring entrepreneurs in need of motivation and strategies to take their life to the next level!

About Writing

Do you have a writing process? If so can you please describe it?

I don't have a specific writing process. I tend to just write when I'm feeling inspired and having an idea in mind. It's one of those things where I'm spontaneous and go with the flow. But then again, that is how I go about doing a lot of things in my life. It helps me to be more creative and enjoy the "process."

Do you outline? If so, do you do so extensively or just chapter headings and a couple of sentences?

I do not outline. However, for Empower You, I did write in the format of outlining, simply because I had the 70 quotes as headlines/titles in place prior to writing what is really just an extension or elaboration of the quote itself.

Do you edit as you go or wait until you've finished?

I did not hire a professional editor to edit my book. So, I did edit as I went along, as well as after the book was completed. The editing process took a few months. Hiring a professional editor definitely would have saved time and energy.

Did you hire a professional editor?

No, I did not hire a professional editor this time. However, I did have someone else edit my writing only after I'd edited my book many, many times beforehand. I definitely plan on hiring a professional editor to edit my future books.

Do you listen to music while you write? If yes, what gets the fingers tapping?

It's funny, but I listen to music while I'm going to sleep, drive, cook, clean, etc. But, I must say, I do not listen to music while I write. I really enjoy writing in silence, because it feels like I can hear my thoughts more clearly, if that makes sense.

About Publishing

Did you submit your work to Agents?

I did not submit my work to an agent. This time around, I've really dedicated my time and effort to researching and figuring out how to successfully self-publish my book on my own.

What made you decide to go Indie, whether self-publishing or with an indie publisher? Was it a particular event or a gradual process?

I have had previous experience with self-publishing and traditional publishing. I made a mistake with both. I did not do my research. I got excited and went with the most convenient options made available to me at the time. To make a long story short, in both instances, I ended up with a box of books and no idea how to promote/market my book. And, in order to get support from the publisher, I would have pay up more money than I had available.

Did you get your book cover professionally done or did you do it yourself?

You know, I decided to really embrace the experience of self-publishing and decided to create my book cover myself. My goal for the book cover was to create something that would convey the overall concept of my book and standout in the company of other self-help and personal development books. I didn't want it to look like a typical self-help book.

Do you have a marketing plan for the book or are you just winging it?

One of the biggest mistakes I made in the past, with my 2 previous books, was not having a marketing plan. Unfortunately, at the time, I wasn't aware of the necessity of having a marketing plan for my book. So, this time around, I definitely have a marketing plan in place.

Any advice that you would like to give to other newbies considering becoming Indie authors?

Yes, I encourage new authors to take their time (writing the book) and don't rush the process. Also, do your research and do it well, when choosing a company to publish with. Publish with a company that will support you during the publishing process and after. And lastly, make sure that you have a marketing plan in place for your book. That way, you'll avoid the biggest mistakes I made with my previous books. By not doing my research and not having a marketing plan in place, I ended up with a box of books and no idea what to do with them, beyond selling to close family and friends. You can avoid that if you research well and plan, plan, plan in advance!

About You

Where did you grow up?

I was born and raised in the sunny and hot valley of the sun! I am a Phoenix native.

Where do you live now?

I live in my hometown of Phoenix, Arizona.

What would you like readers to know about you?

I love to laugh, I am a proud cheesehead (go Packers!) and really, I just love to see people win in life!

What are you working on now?

I am working on putting together my upcoming book tour which will officially kick-off in May, lasting all throughout 2018 and well into 2019!

End of Interview:

For more from Kezia, visit her website.

Get your copy of Empower You from Amazon US or Amazon UK.


from The IndieView https://ift.tt/2JvJQcQ

Thursday, April 26, 2018

6 Best Women’s Sleeping Bags of 2018

6 Best Sleeping Bags for Women

Sleeping bags are still the most popular nighttime insulation option with backpackers because they're warmer in cold, damp, or drafty weather, especially below freezing. While mummy sleeping bag designs still prevail, there's a lot more variety in the types of sleeping bags that have become available in the past five years, including women's specific sleeping bags. Is it worth buying a women's specific bag? You betcha, but they're not as widely available as sleeping bags for men.

Women require more insulation than men because they have less body mass to generate body heat. Add another 10 degrees if you're female and decide to buy a "unisex" sleeping bag instead of a women's specific bag. Women also tend to have colder extremities, like feet, hands, and heads, and require more insulation in those areas. They also have narrower shoulders and are predominantly shorter, requiring sleeping bags that are cut differently than their male counterparts.

When choosing a sleeping bag for backpacking, you want one that's warm, lightweight, and highly compressible since you're going to have to haul it in a backpack. Sleeping bags insulated with 800, 850, 900, and 950 goose or duck down are the best in terms of warmth by weight, but you'll pay a premium at the top end. Fit is also important, both width and length, especially if you're a short women or have a smaller build. If a bag is too large, it will feel colder than one that fits closely, since your body needs to work harder to fill the extra space with hot air.

Here are our top 6 sleeping bag picks for 2018 made especially for women.

1. Feathered Friends Egret UL 20 – Women's

Feathered Friends Egret UL 20
The Feathered Friends Egret UL 20 is top-shelf technical sleeping bag tailored for the female form that features extra fill in the footbox and around the chest. It also provides more room in the elbows including space to draw your knees up in the bag if you like to sleep that way. The contoured hood opens wide in warmer weather and makes it easy for side sleepers to use, while a two-way zipper makes the bag easy to vent. The Egret has a draft collar to help seal in the heat around your shoulders, with a trapezoidal footbox allows your feet to fall in a natural pose without compressing the sides.

Available in two lengths: 5′ 3″ and 5′ 9″, the Egret UL 20 is insulated with 950+ fill power goose down and weighs just 27 oz.

Check out the latest price at:
Feathered Friends

2. REI Magma 17 – Women's

REI Magma 17
The REI Magma 17 is a women's-specific sleeping bag designed around the female form with increased knee and foot space that deliver a high warmth-to-weight ration. An insulated draft collar fills the neck and shoulder gap to seal in the heat and prevent heat loss when you move around at night, while an a hybrid zipper path provides easy access along shoulders and torso. The hood has space for a low-profile pillow and includes two different hood drawcords for a finely tuned fit.

The Magma 17 is insulated with 850+ fill power, water- resistant, goose down with a 15 denier Pertex lining to provide a super soft  feel. Variable baffling keeps the down from shifting, while reducing weight. The Magma is available in a 72 or 66 inch length weighing 36 or 38 oz.

Check out the latest price at:
REI

3. Marmot Phase 20 – Women's

Marmot Phase 20 Women's
The Marmot Phase 20 (Women's) is a female sleeping bag with more insulation in key areas where women experience heat loss. A tapered cut provides a narrower fit at the shoulders and a wider flare at the hips to insure a comfortable fit and maximum thermal efficiency. A shorter 5′ 6″ length helps to avoid cold spots and make certain that your body isn't working unnecessarily to heat uninhabited areas of the bag.

The Phase 20 is insulated with 850+ fill power goose down that's been treated with a water-repellant coating. Weighing 29 oz, the Phase 20 is ideal for women who want to slash pack weight without compromising on sleeping comfort.

Check out the latest price at:
Campsaver | Amazon 

4. REI Joule 21 – Women's

The REI Joule 21 is designed to fit a woman's body, with increased room at hips, decreased room at shoulders, and extra insulation in critical heat-loss areas such as the feet and hood. It features a double-protection design that combines treated, water-resistant down with waterproof/breathable fabric at the hood, sides and footbox, all areas that are likely to touch a damp tent wall. A contoured hood, insulated face muffler, and full-length draft tube all work to seal in the warmth so it doesn't escape when you move around in the bag at night.

The Joule is insulated with 700 fill power duck down. It weighs 35 ounces and is available in 5′ 6″ and 6′ lengths. A wider size is also available.

Check out the latest price at:
REI

5. NEMO Jam 30 – Women's

Nemo Jam 30 womens
The NEMO Jam 30 is a spoon-shaped women's sleeping bag with extra insulation in the feet and torso to keep you warm. Ideal for side sleepers, the Jam has front vents, called Thermo-Gills, that let you vent excess heat in warmer weather. A full-length double-slider zipper with snag guard helps to further regulate warmth. A blanket fold at the base of the hood tucks around you neck and helps seal in the heat in colder temperatures, while the hood is large enough to hold a pillow in place when you don't need to pull it closed in cold weather.

Weighing 35 oz, the Jam 30 is available in two lengths, 5′ 6″ and 6′. It is insulated with 800+ fill power Nikwax water-resistant down.

Check out the latest price at:
REI | Moosejaw

6. Marmot Xenon 15 – Women's

Marmot Xenon 15
The Marmot Xenon 15 is made specifically for women with increased room at the hips, decreased room at the shoulders, and extra insulation in female heat-loss areas. An anatomically shaped footbox with wraparound construction eliminates seams and has extra insulation to keep your feet toasty. The ergonomic hood has extra baffles to reduce heat loss and keep your head warm and comfortable. A "fold down" second zipper lets you to fold down the front of the bag to vent excess heat and makes it easier to get in and out of the bag.

The Xenon 15 is insulated with 800 fill power, water-resistant goose down. It weighs 38 ounces and comes in a 5′ 6″ length.

Check out the latest price at:
REI | Amazon

How to ChooseWomen's Sleeping Bags

Here is a list of the most important factor to consider when purchasing a sleeping bag for backpacking, so it fits your needs and preferences.

TEMPERATURE RATINGS: The introduction of standardized sleeping bag temperature ratings by the outdoor industry substantially improved their reliability. Bags tested with the European Norm (EN) 13537 get two ratings: a Comfort rating and Lower limit rating. The Comfort rating is the lowest temperature at which the bag will keep the average woman (or "cold sleeper") comfortable, and the Lower Limit rating is the lowest temperature at which the bag will keep an average man (or "warm sleeper") comfortable. The difference in the Comfort and Lower Limit ratings is usually about 10 degrees, since women feel colder than men when sleeping. If you're a woman and decide to buy a men's or unisex bag, get one that's 10 degrees warmer than you need so you're comfortable at night.

SIZING: The fit of a sleeping bag is usually measured in terms of length and girth. Girth measures the maximum internal circumference of the bag, usually at the shoulders, hips, and feet. Measure yourself at these points and compare them to the girth to see if the bag will fit tightly or loosely. People with bigger shoulders or sides sleepers tend to feel more comfortable in bags with higher shoulder girths, while women typically need a shorter length bag and a smaller shoulder girth because they have narrower shoulders than men. It's important to get a bag that minimizes the amount of unoccupied interior space relative to your measurements, so your body has less air to heat up to stay warm.

INSULATION and COMPRESSIBILITY: High quality goose and duck down with fill powers of 800, 850, 900, and 950 provide excellent insulation by weight and are widely preferred by backpackers and base campers because they're so lightweight. Some manufacturers only offer down that's been treated with a water-repellent coating, while others prefer to offer it unadulterated. Down is naturally water-resistant so the jury is still out on whether "treated" down makes a difference in the long-term, since it's easy to keep your sleeping bag dry with a little care.

WEIGHT: While gear weight is important, be careful not to sacrifice your comfort by selecting a sleeping bag that won't keep you warm or dry in the conditions you need it to.  When choosing between bags with different outer shell fabrics, consider their breathability, so they will vent perspiration that can degrade your insulation, and whether they have a DWR coating, which can be important if the foot of your quilt gets wet regularly.

FEATURES: Most sleeping bags are pretty similar when it comes right down to it, but there are some features that set premium sleeping bags better than non premium bags. These include draft collars, continuous baffles, very high fill-power goose down, non-snagging zippers, draft tubes positioned behind zippers to seal out the cold, ventable foot boxes, and full length zippers that help extend the range of a bag in warmer weather.

Check out SectionHiker's Gear Guides

Written 2018.

Disclosure: SectionHiker.com receives affiliate compensation from retailers that sell the products we recommend or link to if you make a purchase through them. When reviewing products, we test each thoroughly and give high marks to only the very best. Our reputation for honesty is important to us, which is why we only review products that we've tested hands-on. Our mission is to help people, which is why we encourage readers to comment, ask questions, and share their experiences on our posts. We are independently owned and the opinions expressed here are our own.

The post 6 Best Women's Sleeping Bags of 2018 appeared first on Section Hikers Backpacking Blog.


from Section Hikers Backpacking Blog https://ift.tt/2r53TIn

Wednesday, April 25, 2018

Section Hiker’s Massive Gear Closet Giveaway

Gear Closet Giveaway

If you've been reading SectionHiker for a while, you know that I raffle a lot of the gear I review to readers (click to see a list of past winners.) Unfortunately, a lot of this gear piles up faster than I can give it away, so every few years I give away a LOT of it all at once to make more space in my house. This is one of those times.

READ THIS

If you want one of the items listed below, I will send it to you if you pay for the postage. If multiple people want the same item, I'll pick one randomly and give it to them. Do not request more than one item. Please do not request an item if you simply want to sell it. This gear is for readers to use and benefit from.

QUESTIONS ABOUT THE ITEMS

Most questions can be answered if you read the hyperlinked review or look up the item on a manufacturer's or retailer's website. If you still have a question about it, leave a comment with your question below. Please don't send me email about it.

CONUS/USPS ONLY

I can only send gear to addresses in the continental United States (lower 48). I will only send items via USPS (United States Postal Service) Parcel Select Ground Service (2-9 days) with tracking. Once sent, I cannot be responsible for the item or whether it reaches your address, although I will send you a tracking number so you can trace your delivery.

COST OF SHIPPING

I'll notify you if you're the person who's been selected to receive the item and send you a Paypal invoice for the cost of the shipping. I can only accept credit card or Paypal payments through the Paypal invoice I send you. No exceptions. You'll have 24 hours to pay that invoice. Otherwise, I'll give the item to the next person "in line."

TO REQUEST AN ITEM

Fill out this form (click here). Please only request one item. Don't ask for several items. That's just greedy. You'll have until midnight tonight (PST – 4/26) to request an item, so don't delay.

1. Gregory Alpinisto 50 Backpack

The narrow width of the Alpinisto makes it quite compfortable to carry when it's not overloaded with a lot of external gear
The narrow width of the Alpinisto makes it quite comfortable to carry when it's not overloaded with a lot of external gear

2. Crescent Moon EVA Snowshoes

The Crescent Moon EVA All Foam Snowshoes have curved ends, called rocker, that make them good for running on packed snow.

3. Thule Versant 50 Backpack

The Thule Versant 50 can be used as an alpine style backpack with a floating lid or a panel loaded, good for use when travelling
The Thule Versant 50 can be used as an alpine style backpack with a floating lid or a panel loaded, good for use when traveling

4. Superior Insulated Hammock

Superior Hammock makes an insulated hammock where the down insulation is sewn onto the back of the hammock.

5. Elemental Horizons Kalais XT Backpack

The Kalais XT has huge side water bottle pockets that stick out like hamster cheeks.

6. Gregory Paragon 48 Backpack

The Gregory Packs Paragon 48 is an alpine style backpack with a floating top lid and rear mesh pocket.

7. MassDrop Klymit Ultralight V Sleeping Pad

The MassDrop Klymit Ultralight V Sleeping Pad is available in multiple sizes including a 60 x 20 inch model, shown here.

8. Superior Wilderness Designs Long Haul 50 Backpack

The Superior Wilderness Designs Long Haul 50L Backpack is made with X-Pac, a waterproof ultralight fabric, related to cuben fiber.

9. Supai Matkat Packraft

The Supai Matkat has an uninsulated floor so you'll want to bring a foam pad to sit on when paddling in cold water

10. REI Flash Sleeping Pad

REI Flash Insulated Sleeping Pad

11. Kelty Redwing 50 Backpack

The Kelty Redwing is a versatile backpack that can be used in the backcountry, for day hiking, travel, and even school.

12. Exped Traverse Backpack

The Exped Traverse 40 is a top loading backpack with an additional rear access hatch

13. REI Camp Dome Tent

The REI Camp Dome 2 is a two-door tent perfect for couples car camping.

14. Klymit Lightwater Dinghy

The sides walls of the Klymit LWD are quite low
The NEMO Tetrapod is a fully featured, gathered-end backpacking hammock with a diagonal lay

15. NEMO Tetrapod Hammock

Updated CamelBak Fourteener 24L Hydration Pack
New 2018 CamelBak Fourteener 24L Hydration Pack

16. CamelBak 14-er (2018)

The post Section Hiker's Massive Gear Closet Giveaway appeared first on Section Hikers Backpacking Blog.


from Section Hikers Backpacking Blog https://ift.tt/2r1FKSU

Meridian by Townline in the centre of Burquitlam

Meridian by Townline in the centre of Burquitlam, an upcoming luxurious 32-storey residential high-rise tower compromised of 198 carefully crafted intelligently designed 1-, 2- and 3-bedroom homes, along with a limited collection of only a few exclusive two-level 3-bedroom townhomes. Conveniently located at Cottonwood Avenue and Clarke Road; in the centre of Burquitlam's burgeoning community, adjacent to the Evergreen SkyTrain line and just steps from a plethora of urban amenities.

Opening 2018

The post Meridian by Townline in the centre of Burquitlam appeared first on Vancouver New Condos.


from Buildings – Vancouver New Condos https://ift.tt/2HppYeO

Meridian by Townline in the centre of Burquitlam

Meridian by Townline in the centre of Burquitlam, an upcoming luxurious 32-storey residential high-rise tower compromised of 198 carefully crafted intelligently designed 1-, 2- and 3-bedroom homes, along with a limited collection of only a few exclusive two-level 3-bedroom townhomes. Conveniently located at Cottonwood Avenue and Clarke Road; in the centre of Burquitlam’s burgeoning community, adjacent to the Evergreen SkyTrain line and just steps from a plethora of urban amenities.

Opening 2018

The post Meridian by Townline in the centre of Burquitlam appeared first on Vancouver New Condos.


from Buildings – Vancouver New Condos https://ift.tt/2HppYeO

Tuesday, April 24, 2018

A Mad River Notch Loop Trip Plan: Backpacking the White Mountain 4000 Footers Guidebook

Osceola Backpack
Photo courtesy Paula Dubay-Santucci

The White Mountain landscape is defined by its mountain passes (called Notches), perhaps even more than its peaks. Crawford Notch, Pinkham Notch, and Franconia Notch are just a few of the great valleys that channel visitors from one region of the White Mountain National Forest to the next. This 2 day route runs through Mad River Notch, a lightly travelled mountain pass that links Mt Tecumseh with East Osceola and Mt Osceola and runs past interesting geologic formations, an old logging camp, and two pristine mountain ponds.

Mad River Notch Loop

Rating/Difficulty

*****/3 out of 5

Distance/Elevation Gain

22 miles w/6000′ of cumulative elevation gain

White Mountain 4000 Footers

  • Tecumseh
  • East Osceola
  • Osceola

Recommended Duration

2 days

Season

June thru October

Permits Required

None.

Regulations

Backcountry Camping Regulations for the White Mountain National Forest.

No Camping in Greeley Ponds Scenic Area

New to the White Mountains? Read this Quick and Dirty Guide to Backpacking in the White Mountains for information about camping regulations, road access, trail shuttles, lodging, dangerous wildlife, weather, etc.

Trailhead Directions

  • Mt Osceola Trailhead off Tripoli Rd (FR 30) – 7.0 miles east of I-93 or 2.9 miles west of the Livermore Parking area on West Branch Rd. Tripoli Rd is gated closed in winter, but is usually open by mid May.

Trail Sequence

The route follows the following trails in sequence. Refer to the AMC White Mountain Trail Map 2 – Franconia-Pemigewasset (2017 ed), which is the best waterproof map available for this region, although I'd recommend buying the complete AMC White Mountain Waterproof Map Set (2017 ed) rather than one map at a time. More detailed trail descriptions can be found in the AMC White Mountain Guide (2017 ed), which is considered the hiking bible for the region. Take photos of the pages using your phone for easy reference, instead of carrying the entire book with you on hikes.

  • FR 30 – 1.9 miles (Short rd walk up a pretty fire road)
  • Mt Tecumseh Trail – 3.5 miles
  • Mt Tecumseh Trail – 2.2 miles
  • Pipeline XC Trail – 0.4 miles
  • Livermore Road -0.3 miles
  • Greeley Pond Trail – 0.7 miles
  • Goodrich Rock Trail – 1.6 miles (out and back)
  • Timber Camp Trail – 3.0 miles (out and back)
  • Greeley Ponds Trail – 2.6 miles
  • Mt Osceola Trail – 5.7 miles

Scenic Highlights

The following list provides cumulate distances on the route to each view or landmark

  • Mt Tecumseh Summit – 5.4 miles
  • Sosman Trail Viewpoint – (optional side trail)
  • Goodrich Rock – 9.8 miles
  • High Camp w/ view of Painted Cliffs – 12.1 miles
  • Lower Greeley Pond – 14.9 miles
  • Upper Greeley Pond – 15.4 miles
  • East Osceola Summit – 17.3 miles
  • Mt Osceola Summit – 18.3 miles

Camping Shelter Options

  • High Camp on the Timber Camp Trail – this is good location for camping on this route, near a reliable brook.

Water

Natural water sources are plentiful in the White Mountains although you may need to descend to them from ridgelines along side trails if you run short. In any case, carry a detailed topographic map with you and don't rely on the overview map provided with this trip description to find water sources.

I also recommend purchasing the WMNF Sandwich Range Map in Guthook Guide's New England Hiker Smartphone App (IOSAndroid) which is a GPS guide to all of the trails, trailhead, shelters, campsites, views, and water sources in the White Mountains National Forest. I use it all the time and it is much more complete and current than using the maps bundled with the Gaia Smartphone App.

On the Trail

Leave the Mt Osceola Trail parking area and turn right onto Tripoli Rd (FR 30), hiking 1.9 miles until you see the Tecumseh Trail on the left. There is roadside camping along Tripoli Rd (west) of this point if you're looking for a nearby place to camp before or after the trip. This short road walk up front eliminates the need for a soul crushing walk at the end of this magnificent route, so you finish on a high note, descending from Mt Osceola Trail back to your car.

The western trail head for Mt Tecumseh on Tripoli Rd.

At the Tecumseh trailhead turn left and cross a small stream. There's no easy water for the next 6 miles or so, so be sure you have enough for the climb to Mt Tecumseh and back down again. This western portion of the trail is climbed less frequently, so it has a wilder aspect. Begin climbing through dense forest, eventually passing a false summit at 3700′. Continue through dense forest to 4000′, where you'll emerge at the Tecumseh summit viewpoint. There is a loop trail around the Tecumseh summit which can be confusing, so make sure you hike in the correct direction when leaving the summit area.

Tecumseh Summit Viewpoint
Tecumseh Summit Viewpoint – photo courtesy Hosanna Lillydahl-Schroeder

From the top of Tecumseh, you can see the Tripyramids almost due east, a set of three adjacent peaks. North and Middle Tripramid are also 4000 footers, but South Tripyramid isn't. The three peaks are fun to climb (at another time) on a loop hike via the Tripyramid Trail, which climbs up an avalanche slide (short for landslide) up the north peak, along the adjoining ridge to the Middle and South summits, and back down from the south peak on another avalanche slide.

Sosman Trail
Sosman Trail – photo courtesy Chris Wilton

From the Tecumseh summit viewpoint, there's a short side path called the Sosman Trail that heads south for 0.6 miles to the top of the adjacent Waterville Valley Ski Area. It follows a nice woodland path and provides an excellent view of Mt Osceola from the top of the slopes. To return to the trip route, reverse directions and follow the Sosman Trail back to the Tecumseh summit area, this time descending down (to your right) the Tecumseh Trail headed east.

Tecumseh is a popular peak because is the "shortest" 4000 footer, with an elevation of just 4003′. The trail is also usually well packed out in winter, when skiers and snowboarders hike up it and ski down the adjacent ski slopes. In recent years, this section of the trail has been virtually rebuilt with numerous stone staircases to prevent erosion.

Stone steps on the Mt Tecumseh Trail
Stone steps on the Mt Tecumseh Trail – photo courtesy Chris Wilton

Descend the Tecumseh Trail for 2.2 miles. There are two small stream crossings on the trail which are normally easy to cross except after a heavy rain. The bottom of the trail ends at the Waterville Valley Ski Area parking lot.

Pipeline Trail Sign
Pipeline Trail Sign

Bear left and follow the edge of the lot a short distance to the Pipeline XC trail. Turn left onto the trail and follow it until you reach Tripoli Road. Make a right onto the road and a left at the next paved road.

The Pipeline Ski Trail links the Waterville valley ski lodge to their nordic ski touring center just off Tripoli Rd.

Cross over a short bridge and you'll see the Livermore Trail Head Parking Sign. Turn left at the sign and follow the logging road that leaves from the rightmost side of the lot. This area can be a little confusing because the ski resort has put up their own signs and their trail names differ from those used by the Forest Service. There are maps of the ski trail system posted at most of the trail junctions, so you should still be able to find your way if you get turned around. The Forest Service Trail Signs are always engraved in wood, which is one way to tell them apart from the Ski Resort's XC Trail names.

Livermore Rd Parking Lot

From Livermore Road parking area, the trail passes a kiosk, before turning left and becoming a wide gravel road called the Livermore Trail. Follow it, passing through an open field and crossing a wooden bridge over the Mad River, before turning left onto the Greeley Pond Trail in 0.3 miles.

National Forest Hiking Trails are always marked with engraved USFS trail signs in the Livermore Rd area.
National Forest Hiking Trails are always marked with engraved USFS trail signs.

This trail was severely damaged by Hurricane Irene when a wall of water poured down the Mad River, which runs beside the trail. The entire trail has only been recently reopened after being closed for several years while repair efforts were underway. While the section shown here is well-graded gravel, the trail takes on a more natural and weathered appearance after it passes the Timber Camp and Kancamagus Brook Ski trails further up the Mad River valley.

The southern half of the Greely Pond Trail has been rebuilt and rerouted to repair Irene damage
The southern half of the Greeley Pond Trail has been rebuilt and rerouted to repair Irene damage.

Portions of the Greeley Pond Trail coincide and intersect with backcountry cross-country ski trails in this area. When following trails, note that hiking trails are blazed in yellow, while the cross-country ski trails are generally marked with blue diamonds.

At 1.2 miles, the Goodrich Rock Trail climbs the west side of the valley

At 1.2 miles, the Goodrich Rock Trail climbs the west side of the valley, weaving through a "boulder field" of huge glacial erratics called the Davis Boulders. The trail ends at the largest erratic, a huge boulder named Goodrich Rock, that you can climb via a wooden ladder. The top of the boulder has views of Mt Tecumseh and other Sandwich area peaks. If you're running short on time, you can skip this side trip to Goodrich Rock and continue to a campsite on the nearby Timber Camp Trail, returning to this point the next morning.

Arriving at the largest, which can be climbed via this ladder.
Arriving at the largest boulder, which can be climbed via this ladder.

Retrace your steps back to the Greeley Pond Trail and turn left. The Timber Camp Trail branches to the left in 0.8 miles. Turn left onto it and begin climbing gradually. The trail leads to a clearing with a large cairn in about 0.9 miles and is the best place to camp in the area, with easy access to the adjacent Greeley Brook.

Timber Camp Trail Sign

The site of an old lumber camp, the Timber Camp Trail leads to the area below Painted Rock, a huge cliff face that towers over the trail and the Mad River Valley. While the trail ends at 2544′ at a cairn next to some old lumber artifacts, there is a herd path that continues up the slope beyond it. Steve Smith, editor of the White Mountain Guide, has written about his adventures on the Timber Camp Trail, in this trip report.

The Painted Rock Cliff Face towers above the valley below.

Hike back down to the Greeley Pond Trail, and turn left for the Lower and Upper Greeley Ponds, which lie below the southern cliffs of giant Mt Kancamagus. Situated in the Greeley Ponds Scenic Area, camping is not permitted in the area surrounding the ponds. Both Ponds are stocked with trout, however, and fishing is permitted with a New Hampshire fishing license.

Lower Greeley Pond
Lower Greeley Pond

Hike for 2.6 miles past the ponds, until you reach the Mt Osceola Trail Junction. Turn left and begin climbing to East Osceola Mountain. While the climb is gradual to start, it soon becomes very steep, crossing an avalanche slide at one point. The wooded summit of East Osceola is viewless and marked by a small cairn.

East Osceola Summit Carin - photo courtesy Jim St. Cyr
East Osceola Summit Carin – photo courtesy Jim St. Cyr

East Osceola and the main peak, Mt Osceola are connected by a narrow ridge. Partway across, there's a narrow 20′ chimney that you must climb, although there's now an easy bypass route to the side that provides surer footing.

The Osceola Chimney
The Osceola Trail Chimney – P

After the chimney, climb gradually to a large open ledge at the top of Mt Osceola, which has expansive views of the Tripyramids and peaks in the Sandwich and Pemigewasset Wilderness Areas. The site of a former firetower, this ledge is an excellent place to eat lunch and hang out in the sun.

View from the Mt Osceola summit ledge
View from the Mt Osceola summit ledge – photo courtesy Jim St. Cyr

From the Osceola summit ledge, turn southwest and follow the rocky Mt Osceola Trail down Breadtray Ridge for 3.2 miles back to the Osceola Trailhead on Tripoli Road, where your car is parked.
Written 2018.

About Philip Werner: Philip is the 36th person to finish hiking and backpacking all of the trails in the White Mountain Guide. He's also finished hiking many of the region's peakbagging lists including the White Mountain 4000 footers, the 4000 footers in Winter, the Terrifying 25, the RMC 100, and the Trailwrights 72. Philip is a 4 season backpacking leader for the Appalachian Mountain Club, a member of the executive committee for the Random Hikers, a Long Trail Mentor for Vermont's Green Mountain Club, and a Leave No Trace Master Educator. He also teaches several compass, GPS, and off-trail navigation courses each year, listed on Outdoors.org.

Safety Disclaimer

This trip plan can not alert you to every hazard, anticipate your experience, or limitations. Therefore, the descriptions of roads, trails, routes, shelters, tent sites, and natural features in this trip plan are not representations that a particular place or excursion will be safe for you or members of your party. When you follow any of the routes described on SectionHiker.com, you assume responsibility for your own safety. Under normal conditions, such excursions require the usual attention to traffic, road and trail conditions, weather, terrain, the capabilities of your party, and other factors. Always check for current conditions, obey posted signs, and Backcountry Camping and Wilderness Area Regulations. Hike Safe and follow the Hiker responsibility code. 

Disclosure: SectionHiker.com receives affiliate compensation from retailers that sell the products we recommend or link to if you make a purchase through them. When reviewing products, we test each thoroughly and give high marks to only the very best. Our reputation for honesty is important to us, which is why we only review products that we've tested hands-on. Our mission is to help people, which is why we encourage readers to comment, ask questions, and share their experiences on our posts. We are independently owned and the opinions expressed here are our own.

The post A Mad River Notch Loop Trip Plan: Backpacking the White Mountain 4000 Footers Guidebook appeared first on Section Hikers Backpacking Blog.


from Section Hikers Backpacking Blog https://ift.tt/2qZ2wdd