Winter backpacking is very different from three season backpacking. It requires more gear, good decision-making, and many new skills. It's almost like backpacking on a different planet because so many things you take for granted during the rest of the year are different.
For example: you need to melt snow to make drinking water and to keep your boots in your sleeping bag at night so they don't freeze. You need extra flotation so you don't sink into the snow and extra traction to avoid sliding on icy surfaces. You have to use special stoves and fuel for cooking that you don't use the rest of the year, and the list goes on.
One of the best ways to understand the differences between winter and three season backpacking is to look at the differences in the kind of gear you need to carry. I've done this in the form of an annotated gear list below, organized around the core activities that make up a winter backpacking trip. There's a lot of information packed into this post about winter backpacking activities, gear requirements, and alternatives that I think you'll find useful if this is new to you.
If you have questions, ask them in the comments. I'm happy to respond.

This winter backpacking gear list is designed for use in temperatures down to -10F for camping in protected camp sites. At just over 27 pounds, without food, fuel, or water, it's a good example of a lightweight winter backpacking gear list and the tradeoffs that you can make to reduce the weight of your winter gear without skimping on comfort or taking too many risks.
I've broken the gear list into the following sections:
- clothing for camp
- clothing for hiking
- clothing for layering
- hydration
- cooking
- navigation
- electronics
- first-aid
- packing
- shelter
- sleeping
- traction
Clothing for Camp
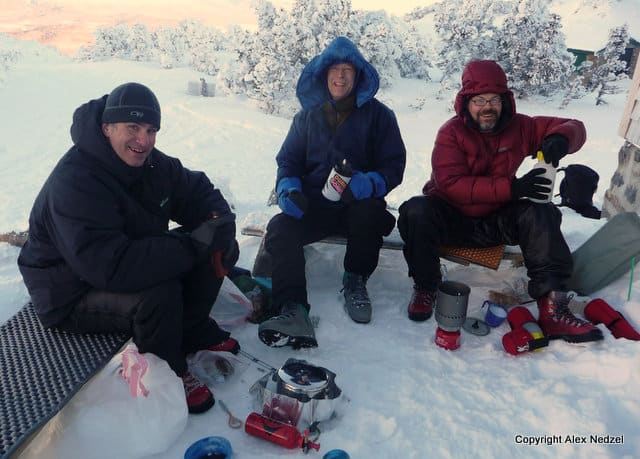
Winter backpacking involves a lot of sitting around in the cold so you can cook and melt snow for drinking water. We do this to be social (because it's fun) and to avoid dying from carbon monoxide poisoning in our tents or burning them down around us.
| name | description | weight oz. |
|---|---|---|
| Darn Tough Hiker Socks | Wool socks | 2.4 |
| Glasses hard case | Protect glasses when sleeping | 4 |
| Montbell Mirage Parka | Puffy hooded insulation | 14.4 |
| Montbell Thermawrap Pants | Insulated Pants | 12.4 |
| Mountain Hardware Dome Perignon Hat | Really warm hat | 2.1 |
| Patagonia Capilene LW Bottoms | Sleeping baselayer | 5.9 |
| Polar Buff | Neck insulation | 2.8 |
| Supernatural Jersey | Sleeping baselayer | 6.7 |
When melting snow or cooking dinner, you're not moving, so you need to pile on the insulated clothing to stay warm. This typically includes a heavy insulated jacket, insulated pants, warm gloves, and head-gear, layered over your day time clothing if it's dry or your sleeping clothes. You'll often wear your regular winter boots in camp, but some people bring down booties to keep their feet warm.
Most of these extra "camp" layers are too warm to wear when you're hiking, but you do need to carry them nonetheless. However, they can be used to augment the warmth of your sleeping bag: I use mine that way so I can take my zero-degree sleeping bag down to -10 degrees. I'm not that interested in camping in anything colder because it's kind of unpleasant. It took me many years to admit this to myself, but when I did I was able to switch from a -25 degree sleeping bag to a much less expensive and lighter weight, zero degree sleeping bag.
Clothing for Hiking
You don't want to dress too warmly for winter hiking. You'll be carrying a much heavier pack than in summer, wearing heavier boots, and possibly snowshoes or crampons. Sweat is bad because it will accumulate in your clothes and cool you whenever you stop moving. This can snowball in crappy conditions and lead to hypothermia. If you start to sweat, strip off layers or slow down so your body generates less heat.
| name | description | weight/oz. |
|---|---|---|
| Baffin Borealis Boots | Lightweight double Insulated Boot | 48 |
| Darn Tough Hiker Socks | Cushioned | 2.4 |
| Minus 33 Ticonderoga Wool Jersey | Medium weight | 8.4 |
| Mountain Hardware Fleece Hat | Light enough for exertion | 0.8 |
| Possumdown Gloves | Highly breathable | 1.5 |
| Rab Polartec 100 Fleece 1/2 zip Pullover | Thin, easy to vent, warm when wet | 9.9 |
| Ragged Mountain Interval Uncoated Gaiters | High breathable gaiters | 4.3 |
| REI Activator V2 Soft Shell Pants | Breathable, stretchy | 17.3 |
| Under Armor Heatgear Boxers | Non-chafing, some insulation | 3.2 |
It's not unusual for me to backpack stripped down to my baselayer shirt. I also rarely wear long johns under my soft shell pants because I get too hot. I use them for sleeping instead.
My Baffin Borealis winter backpacking boots require some explanation. Called double insulated boots, they have removable liners. This is desirable in winter so you can sleep with your liners in your sleeping bag and not your entire boots. You do this to prevent the liners from freezing at night using your body heat. These Baffin Borealis boots are a real find because they're super lightweight and you can walk easily in them. If your winter boots don't have removable liners, you should be prepared to sleep with them in your sleeping bag. Same goes for your water bottles.

Clothing for Layering
External temperatures or wind chill can vary widely on a winter backpacking trip, depending on the time of day, your location, and the amount of surrounding vegetation. It's best to carry additional layers that you hold in reserve so you can layer up or off as conditions change. This is normal on winter hikes and backpacking trips, with people calling for layer breaks all the time.
| name | description | weight/oz. |
|---|---|---|
| CAMP Wind Gloves | Wind shell exterior, soft shell glove | 3.5 |
| Golite Reed XL Rain Pant | Women's boot zip, no longer made | 6.7 |
| Marmot Softshell Gloves | Dries fast | 2 |
| Outdoor Research Cornice Mittens | Waterproof shell mitts, limited dexterity w/Primaloft inner insulated gloves | 8.4 |
| Outdoor Research Panorama Point Jacket | WTB Shell with pit zips. Size XL | 13.0 |
| Smith Knowledge OTG Fan Goggles | Internal fan to prevent fogging | 6.1 |
| Sunglasses + Case | Glare protection | 4.2 |
Your extra layers should be easy to put on or take off and they should be packed where they're easy to access in your backpack. This includes extra hats, extra gloves, jackets, pants, a buff (neck gaiter), balaclava/face mask, gaiters, sunglasses, or goggles. If you wear big boots, bring rain pants than you can put on or take off without taking your boots off – usually pants with full or 3/4 side zips. My boots are small enough that I can put them on with just boot zip rain pants.
It will be rare for you to need your camping clothes during the day, with the exception of your big puffy jacket, if you stop for a snack or water break. But you have those warm extra layers in reserve if you need them.
Hydration
The amount of water you carry on a winter backpacking trip usually varies between two and three liters, so you don't have to stop and melt more using a stove during the day. You should shoot to have a half-cup of water left at the end of the day as a starter for melting more snow. If you try to melt snow in a dry pot, you'll burn it and maybe hole your pot.
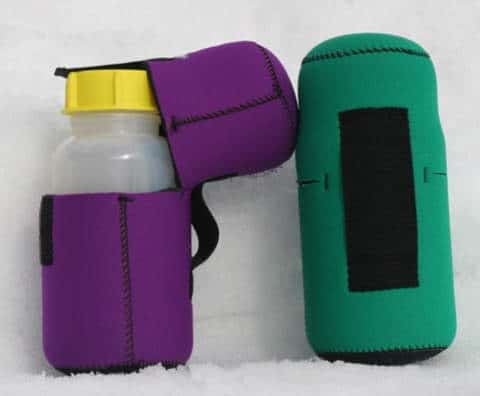
You'll want to carry one bottle in an insulated container (foam or neoprene) outside your pack for easy access, positioned upside down so the cap doesn't freeze. You can store the other bottles inside your backpack, snuggled among your insulating layers in order to save weight on added bottle insulation. You should carry your water in wide mouth bottles which are less likely to freeze and easier to open if they do. I like to carry soft propylene wide-mouth Hunersdorf bottles in winter, which won't crack if frozen, and are easy to open while wearing mittens.
| name | description | weight/oz. |
|---|---|---|
| Forty Below Bottle Boots (1 liter) | Neoprene insulated covers for 1 liter bottles | 3.8 |
| Hunersdorf Bottle (1 liter) | Wide mouth bottle | 4.8 |
| Hunersdorf Bottle (1 liter) | Wide mouth bottle | 4.8 |
| Hunersdorf Bottle (1 liter) | Wide mouth bottle | 4.8 |
If you can find water in liquid form, you still have to purify it. Boiling is an effective way to do this, since you'll want to heat it up anyway to keep it from freezing overnight. A Steripen can also be used. Chemical reactions are too slow in the cold and filters break if they freeze.
Cooking
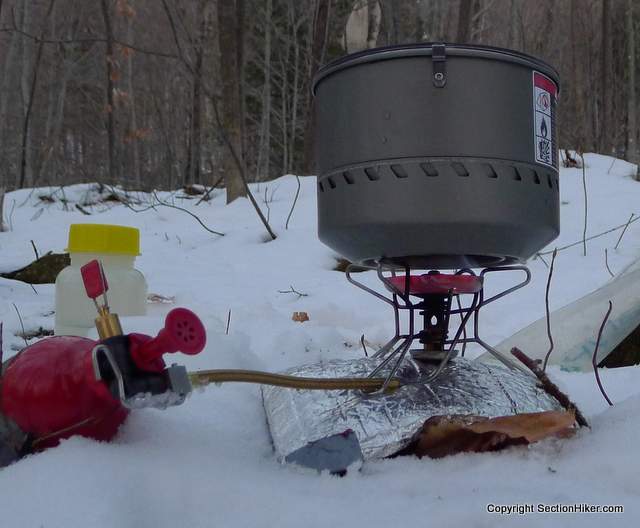
All this boiling and melting snow takes a lot of time and stove fuel. I like to use a liquid fuel stove for winter because liquid fuel (white gas) is the highest BTU fuel available and it will burn down to -40F. While you can use a canister stove in winter, it becomes increasingly difficult to use under 20F. You can push that down to about 0 degrees with a special inverted canister stove like the Jetboil Joule. But liquid fuel is still the best all round solution in my opinion, and makes it easy to share fuel in a group, since so many other people use liquid fuel stoves in winter. That extra redundancy is nice.
| name | description | weight/oz. |
|---|---|---|
| Evernew 1.3 L Titanium Pot w/handle | Winter size for melting snow | 4 |
| Light My Fire Fire Steel | Fire starter | 1 |
| Mesh Stuff Sack | Holds winter stove kit together | 0.8 |
| MSR 20 oz Fuel Bottle | 6.3 | |
| MSR Whisperlite | White Gas Stove w/fuel pump | 11.4 |
| Folding Windscreen | Accordion, compact | 4 |
| OP Sack | Food bag, heavy plastic | 1.3 |
| Sea to Summit Delta Insulated Mug | With cap, liquid measurements | 4 |
| Victorinox Classic Swiss Army Knife | Tiny little knife with scissors | 0.7 |
Packing space is at a real premium in winter, but winter cooking gear can be bulky. With the exception of my fuel bottle and insulated cup, my entire cook system fits in my stove pot, which keeps it nice and compact. At 1.3 liters, the pot is about as small as you can go for melting snow, since you can only melt one bottle's worth at a time.
Navigation
Navigation needs can vary widely in winter. While a map can suffice if you're on a well-used trail system and visibility is good, trails become more difficult to find in winter when they're covered in snow, the horizon is fogged in, or the snow is so deep that the blazes are buried under your feet. I always carry a compass for route finding, but it takes some practice to be able to use it effectively in winter.
I also carry a whistle, something I carry all year, which is good for signaling companions when you can't see them, like in dense fog or heavy vegetation. A whistle carries farther than the human voice and you can blow on it without becoming exhausted.
| name | description | weight/oz. |
|---|---|---|
| Fox 40 Plastic Whistle | Really loud whistle | 0.1 |
| Suunto M3 Compass | Adjustable declination | 1.5 |
While I do use an iPhone for GPS navigation during the rest of the year, I switch to a Garmin eTrex 20x GPS unit in winter because it's waterproof, has a better battery life than a phone, and most importantly, it can be used while wearing heavy gloves. The GPS unit is not part of my base gear list, because it's often not needed.

Electronics
I always bring a digital camera because I take a lot of photos, as well as a Garmin inReach mini Satellite Messenger. The mini lets me send out periodic "OK" messages, which my wife appreciates, and would be useful in an emergency to contact Search and Rescue if I'm out of cellphone range. I also carry a phone because it's a better way to contact search-and-rescue if a cell phone signal is available. I also read books and take notes on it.
It's also important to use Lithium-Ion Batteries to power electronic devices in winter because they don't freeze like alkaline batteries, which contain a water-based electrolyte solution.
| name | description | weight/oz. |
|---|---|---|
| Nitecore NU20 Headlamp | micro-USB Rechargeable | 1.66 |
| Lumix DC-ZS70 Rechargeable Camera | micro-USB Rechargeable | 11.3 |
| iPhone w/Lander Case | Lightning-USB Rechargeable | 5.9 |
| Garmin inReach mini | micro-USB Rechargeable | 3.5 |
| Battery Pack and cords | 6.0 |
In the past year, I've also replaced my headlamp, camera, and satellite messenger with products that are micro-USB or apple lightning compatible so that I don't have to carry device-specific batteries for them. I now carry a single 8000 mAh battery pack and a few short cords so I can recharge them if needed. Standardizing around USB rechargeable devices has simplified my trip preparation and eliminated the need to throw out partially-used batteries after each trip.
First-Aid
I use the exact self-assembled first-aid kit in the winter that I carry the rest of the year. Nothing special: Benedryl, Aspirin, Advil, ear plugs, Leuoktape for blister prevention. Some other odds and ends. You can find a complete list of my first aid contents here: Homemade Ultralight First Aid Kit.
| name | description | weight/oz. |
|---|---|---|
| First aid kit | Self assembled | 6.6 |

Packing
One of the keys to reducing your winter gear weight is to keep the volume of the backpack you need as small as possible. That means carrying highly compressible gear and learning how to attach gear to the outside of your backpack using its external attachment system. The weight of your gear is important of course, but if you can keep the volume of your pack under 60 liters, you're going to be way ahead of the game. This may require some compromises on your part, for example, not backpacking when temperatures are less than zero degrees, but you can't have it both ways.
| name | description | weight/oz. |
|---|---|---|
| Hyperlite Mountain Gear Stuff Sack | cuben fiber stuff sack | 0.5 |
| Hyperlite Mountain Gear 3400 (55L) Southwest Pack | cuben fiber pack | 32.4 |
| Lowepro Dashpoint 20 | WP Camera Pocket. Attached in shoulder strap. | 1.9 |
| Mini-biner | Attach swiss army knife to pack | 0.1 |
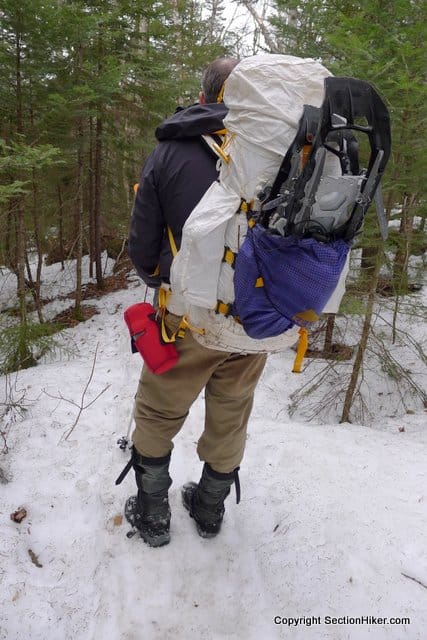
My winter backpack is a dyneema (formerly cuben fiber) Hyperlite Mountain Gear 3400 (55L) Southwest backpack, the same pack I use for longer multi-day backpacking trips the rest of the year. I can fit all of the gear, food, fuel, and water I need for winter backpacking inside it or attached to the outside of the pack with extra room to spare. I've used slightly larger backpacks in the past, but this one weighs significantly less, just over two pounds. It opens from the top with a roll top, which I find useful in winter because I can quickly find the gear I need.
Dyneema backpacks are not waterproof because you need to make holes in the fabric to sew on the shoulder pads and hip belt. I line my pack with a white trash compactor bag to keep its contents dry, and while I use stuff sacks or Ziploc baggies to organize gear, I pack a lot of clothes in my pack loose. I find that this reduces the pack space required by my clothes, eliminating the air gaps between other bulkier items inside my backpack. Experiment with this and see what you prefer.

Shelter
My goto shelter in winter is a freestanding Black Diamond Firstlight Tent which I think is the best lightweight all-round winter backpacking tent made. Weighing just 43 ounces, it's truly freestanding so you can set it up just about anywhere. It has very steep walls that shed snow well, good head room, and has plenty of interior space since it's designed for two (very friendly) people.
| name | description | weight/oz. |
|---|---|---|
| Black Diamond Firstlight Tent | Freestanding, 4 season tent | 43 |
I don't carry any tent stakes to pitch this tent. If I need anchors, I take apart my poles and use them as stakes (shown) or anchor the other guy out loops with other gear I carry, like snowshoes, crampons, or an ice axe. I rarely even bother to sinter (harden) the snow under the tent and just set it up. Since it's freestanding, I can pitch it in less than 2 minutes, climb in, and change into dry clothes without standing around and getting cold. Freestanding tents are priceless in winter but few truly freestanding tents are made.
Sleeping
It's not unusual to sleep for 12 hours on a winter backpacking trip, so you might as well make the most of it and be comfortable and warm. The key to this is bringing a warm sleeping bag and a thick sleeping pad with a high R-value. Many people like to bring two sleeping pads in winter and combine them to get the R-value (which is additive) that they need.
The R-values for sleeping pads aren't tested uniformly the same way across manufacturers, but they're the best measure of thermal resistance (insulation) available to consumers, so useful for guidance. I think an R-value of 5 or 6 is ideal for winter camping, so that's the amount of sleeping pad insulation I shoot for, and experience has proven this out.
| name | description | weight/oz. |
| NEMO Sonic 0 Sleeping Bag | Roomy winter bag | 42 |
| REI Compression Sack | For sleeping bag | 3 |
| Therm-a-Rest Xtherm Sleeping Pad | R value=5 | 15 |
| Therm-a-Rest Zlite Sleeping Pad | Doubles as sit pad | 8.1 |
I bring an insulated Therm-a-Rest XTherm inflatable mattress (R-value =5 ) for comfort and a shortened foam Therm-a-Rest Zlite sleeping pad, which serves as my sit pad during dinner, when we sit on snow to cook and melt snow for drinking water. You don't want to forget a sit pad on a winter backpacking trip or you'll freeze your ass off!
I put the Zlite under the XTherm at night for additional insulation. Foam pads like this are also preferred for shielding accident victims from hypothermia from the ground, which is why you see so many winter day hikers and backpackers carrying them on the trails. It's good to have at least one in your group.
As I mentioned previously, I downgraded from a -25 degree sleeping bag to a 0 degree sleeping bag, when I realized that I don't really enjoy backpacking in sub-zero temperatures. It took me a long time to realize this – nearly a decade. But after I switched to a 0 degree bag, I was able to switch to a smaller volume backpack, and so on, shaving more weight from my gear list. I still carry enough extra insulated clothing that I can take my 0 degree bag down to -10, but I'm also likely to postpone a backpacking trip if the weather forecast is that cold at night.
Traction
I always bring microspikes, snowshoes, and trekking poles on winter backpacking trips, so they have a permanent spot on my winter gear list. It's important to replace the summer baskets on your trekking poles with snow baskets for winter travel. They really are an essential flotation aid for winter hiking.
| name | description | weight/oz. |
|---|---|---|
| Hillsound Trail Crampon Ultra | 16.8 | |
| MSR Evo Ascent Snowshoes 22 inch | Bomber snowshoe | 64 |
| Pacerpole Dual Lock Poles | Carbon fiber w/snow baskets | 20.8 |
The MSR Evo Ascent Snowshoes I use are intended for climbing mountains and have a televator wire that lifts up under the heel to make them easier to climb slopes with. This unibody plastic snowshoe is also much better off-trail than a snowshoe with an attached fabric deck, because branches can't become caught between the deck and the frame. I do a lot of off-trail hiking in winter and there's a slight weight penalty (just a few ounces) for using these snowshoes instead of decked ones that are slightly lighter.
Extra Gear – As Needed
When I don't need this extra gear, I'll leave it at home. It consists of extra traction, navigation, and a shovel for digging out camp kitchen or vestibule trenches in deep snow.
| name | description | category | weight/oz. |
|---|---|---|---|
| Hillsound Trail Crampon Pro | ratchet style crampon | traction | 24.9 |
| CAMP Corsa Ice Axe | UL Ice axe | traction | 10 |
| Garmin eTrex 20x GPS | w/ lithium ion AA batteries | navigation | 4.6 |
| Voile Telepro Avalanche Shovel | for digging snow furniture | shelter | 29 |
The decision on whether to bring crampons or a GPS has a lot to do with the terrain where we plan to hike, the weather forecast, and trip reports that document local conditions that are posted by other hikers and backpackers.
Wrap Up
This 27 pound winter backpacking gear list is pretty streamlined and lightweight and should provide you with a good template of the gear required for winter backpacking and camping. My advice – figure out what is right for you to be safe and comfortable, and suck it up if it weighs a bit more than you'd like. Winter backpacking gear IS heavier than three season hiking gear, but if you can get your full-out pack weight for a two night trip under 40 pounds, including food, water, and fuel, that's a good target weight to shoot for.
See Also:
Help support this site by making your next gear purchase through one of the links above. Click a link, buy what you need, and the seller will contribute a portion of the purchase price to support SectionHiker's unsponsored gear reviews, articles, and hiking guides.The post Winter Backpacking Gear List Explained appeared first on Section Hikers Backpacking Blog.
from Section Hikers Backpacking Blog https://ift.tt/2SpdIMi
No comments:
Post a Comment